Introduction

There are dozens of types of buttons that can be made with a needle and thread,* one of the most effective and easiest to make is a Yorkshire button. I have read that there was once a Yorkshire Button industry that was as important as the silk button industry in Macclesfield, but I have yet to find any evidence. However it was in Yorkshire – at a Knitting an̶d Stitching show in Harrogate – that I was given a leaflet with very basic instructions for working a Yorkshire button and I have since had great fun making the buttons in a variety of sizes and thread combinations.
* see Buttons, a passementerie workshop manual, by Gina Barrett ISBN 978-0-957243-3-2
Equipment and Materials

Thread: pearl cotton #5 or #8 are best for practice, but experiment with other threads.
Card or plastic template
Scissors for thread and card
Sewing needle, preferably blunt like a tapestry needle, with an eye that will take your chosen thread.
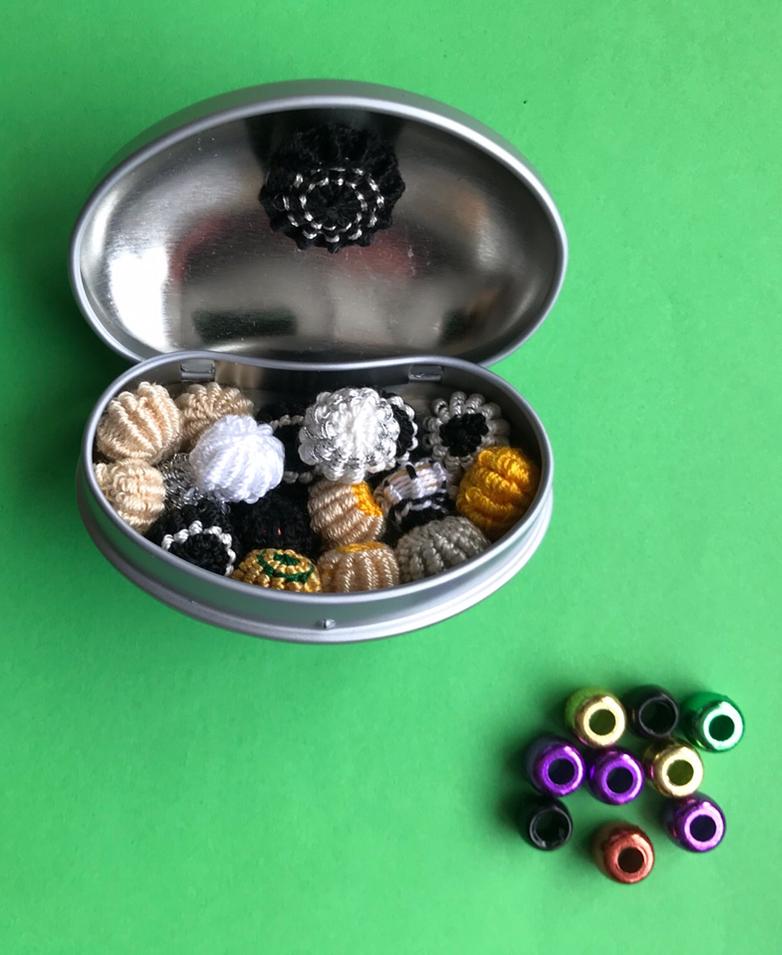
Filling: one of the buttons above is filled with a small pompom, the other with a 5p coin
Preparing a template
You need a flat disk with a central hole and 12 slots around the circumference. Several sizes are given below for you copy. I usually print a page of different sizes onto thin card then stick that card to another card of the same thickness. If using a paper copy stick it to a thicker but flexible card such as that from a cereal carton – use Prittstick or similar. (Check the sizes of your printed circles)
Cut out a circle, then use a large pin to pierce a hole in the centre, wiggle it a bit to make the hole large enough to take your needle; cut 12 equal length slots around the outer edge of the card as marked on the circles.

Note: if the slots are unequal in length or the hole not in the centre it will be more difficult to get an even shape to your button.
Number slots 1-12
Note: you should be able to make several buttons before you need to replace a template

First Button
You will need: 4cm diameter template; Long length of #5 pearl cotton*; Tapestry needle. Small amount of filling – in this case a small pom-pom
* Buttons do require a surprising amount of thread; ideally you will work each button with a single length of thread, however it is hard to estimate how much as it depends on the thickness of the thread and your tension when working. It is not difficult to join in a new thread – instructions are given later – so work with the longest thread comfortable.

Making the button – stage 1
1. Thread a blunt needle with a long length of your chosen yarn; bring thread up through centre hole of disc, leaving 5-10cm below; take long end of thread into slot 12, round behind the card and up through 1. (A)

2. Then go straight across the disc, down through 7 and up through 8. (B) Tighten if necessary by pulling thread at the back. [Note: you don’t actually need the needle at this stage, but I find it easier to keep it on the thread.]

3. Take thread across disc to 2, up at 3, back to 9. … Keeping the thread tight, continue until thread goes down at 11 – there will be no spoke at 6. (C)
4. Check the back of the disc: it should look like D
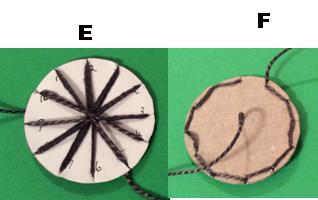
5. Come up at 12 and go round again starting 12 to 6, coming up at 7 then going down at 1…. this round will result in double threads on most spokes (E) and will fill in the gaps at the back of the disc (F) – come up at 6.
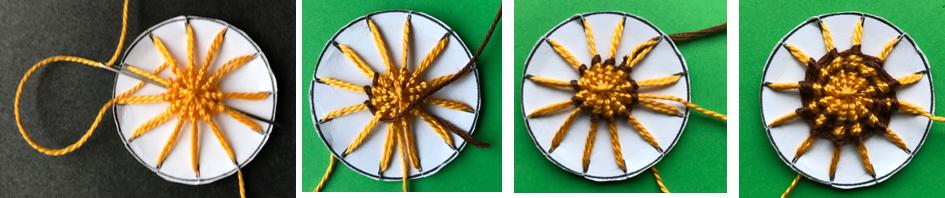
Stage 2
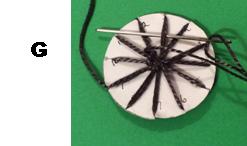
6. Using the needle, take the thread from 6 across the centre, under the spoke from 12, then back under 12 and 11 (G)

7. Continue stitching round the spokes, each time going back over one spoke, then forward under two; tension the first rounds of stitches firmly to ensure a neat centre. (H)


8. Work until there is no room for any more stitches; take thread back through the nearest slot.
10. Make one stitch into each of the loops at the back of the disc. (I)
11. Release threads from the disc by slightly bending the edge of the card.
12. Gather the loops slightly by carefully pulling on the stitching thread. (J)
13. Insert filling and complete gathering until the button is firm and stitch to close the back. (K)
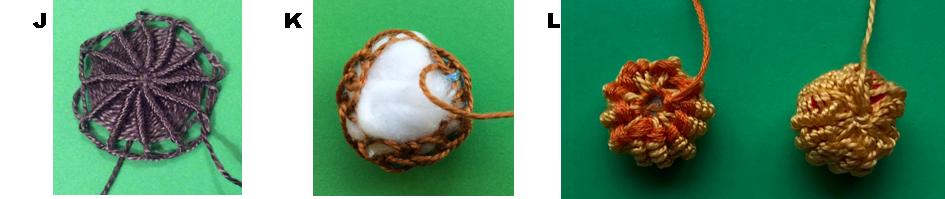
14. Stitch firmly across the back and either take the thread end into the back of the button, or leave it long to stitch the button in place (L, coin on the left, pom-pom on right)
Adding a thread
To add a new thread if you run out while working a plain button:
Take the old thread round the nearest spoke, under the worked area and through the slot at the end of the opposite spoke. *
**Bring the new thread up through a neighbouring slot and under the worked area; continue stitching.
To change colour
Work as for ‘Adding a new thread’ (above), ‘parking’ colour A at * Bring in colour B at **, work one or more rows, ‘park’ this thread then bring A back into use.
Fillings
Cotton wool or similar is fine for light coloured buttons, but may show through between dark stitches – for these try a ball of scrap wool, or other threads. Small pompoms (sold in children’s craft departments) can work well, beads are another possibility -‘pony beads’ (also known as ‘crow beads’) work well with beads made on a 2.5cm (1 inch) disc. Coins, counters, small rings and even old buttons are good for flat buttons.
Variations

Use different sizes of disc and thicknesses of thread (eg 8 or12 pearl on 2.5cm disc).
A variegated thread can give an interesting effect.
For a smooth button stitch in the opposite direction: ie under one spoke and back over two.
It is possible to save on expensive thread by using a different thread for working the spokes – this thread will show in the centre of the button so use a close colour match unless you want the contrast.
A single round of a metallic thread can look like a line of beads. Or actual beads can be used – either pick them up between the ridges while stitching, or have them on a separate thread that is trapped as you stitch.

It is possible to work bigger buttons on larger disks, but even with additional spokes the outer lines of stitching are very loose.